
|
|
| News |
Conquest
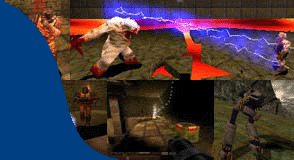
view changes Conquest is a single player mod for Quake. There are several outstanding features, some of which are done already (such as the shop, shielding, and many weapons), others aren't (such as the town, and using frik_file to transfer all this stuff between levels). If you're not sure you want to read this whole description, then skip straight to the story at the bottom. It may spark your interest. :D
Town You start the game in the town. There's a shop here, an Inn, a save point, and lots of people wandering about to talk to. Some folks will have missions or tasks for you to do, but most of them want you to destroy the hoards of demons and prevent them from raiding the town again. From the town you can visit the various Quake levels in order. Each time you complete a level, you unlock the next level and return to town. You can re-visit previously beaten levels as well, to gain more money, find items, or level up your character. While playing a previously-beaten level, you can return to town at any time.
Shop There's a shop in town. You can buy and sell weapons, ammo, shields, and items, and convert gold to credits. There are also other shops located in various locations around each level (and you can heal yourself there, though the inn is much cheaper), but their prices are slightly higher. You can navigate the shop menus by pressing numbers 1-10, or more preferrably by using the arrow keys to move the selection around, and pressing attack and jump/altfire to select or cancel. Selling things back to the shop is not a bad thing. The shop is owned by a third party that doesn't usually give discounts, but the towns people like you and they were able to convince the shop to give you a break (but he'll still charge you full cost for buying, go figure). If you give something back in the condition it came in -- the same amount of ammo the weapon was sold with, for example - you can sell it back for the same price and lose nothing. Shields always sell for full price, even if they're damaged (because they're easy to repair). The only times you don't get all your money back is when you sell a weapon with less ammo than it came with, or place a mod on your weapon (such as modding a grenade launcher into a napalm launcher). You gain money to use at the shop by killing monsters. Monsters will give you two different kinds of money: credits and gold. Credits are what you can use at a shop to buy all those shiny rocket launchers, machine guns, and holy sp0rks of poking with which you fight monsters. You gain these credits instantly as a bounty for any monster you kill. The reward is automatically credited to your account. Monster also drop gold onto the ground when killed. Gold cannot be directly used for anything, but it can be converted into credits at the shop in town (not the shops in the level).
==== When you use the shop outside of town or open one of your menus, the game around you pauses. All the enemies freeze and stop attacking, so that you can shop or reorder your weapons and items in peace. When you close the menu, everything starts back up again.
Item Pouch You can carry up to 20 items with you. Items include stuff dropped by monsters that you can sell, healing items, some powerups, runes, and monster eggs (more on those later). You can sell the items in your pouch at the shop in town, but the shops in the levels won't accept them. If you don't have any room in your pouch for a new item, you can discard something you don't want. You can also sort the items there to make them easier to see.
Damage types
Weapons can do one of two different types of damage - Solid and Energy. Solid rounds rely on impact or piercing power to deal their damage. Some examples would be machinegun bullets, explosions, and axes. The type of damage is important because the enemy's shielding may block certain types, and the monster itself may have a certain vulnerability to one type or the other. Also, the damage type will determine what kind of ammo you need to pick up to replenish its stock.
Weapons You have 5 slots for holding weapons. You can buy whatever weapons you want, and even buy a weapon multiple times. In fact, you can buy 5 railguns if you can afford it; however, it's beneficial to have a variety of weapons so you can deal with whatever shielding the enemy has. Filling your weapon with ammo will often cost more than the weapon itself. The weapon comes filled with some ammo, but you'll probably want a lot more, and that'll cost you big-time. This can be a strong reason to not buy powerful weapons until you have lots of money to maintain them. However, there is an advantage to the cost - you can collect ammo for the weapon and sell it back for good money. Some weapons can be modded into other weapons at the shop. For example, the Grenade Launcher can be modded into a Napalm Launcher, for a small price. This greatly changes the function of the weapon (the way the attack functions, reload times, ammo capacity, etc). The Napalm Launcher creates areas of flame that hurts anything in a radius around it, and can even set the enemy on fire and inflict the "interference" status effect on their shielding. The mod also changes the attack type. Napalms do Energy-type damage, whereas grenades do Solid-type damage.
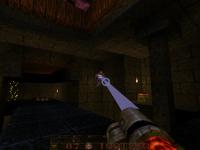
A limited few weapon examples (that are already done): Machine Gun - Standard weapon. Lots of ammo and rapid-fire, but very weak attacks. Any amount of precision shielding tends to be bad for it. It does weak but reliable damage early on, but later you might want to scrap it in favor of more powerful weapons. Pulse Rifle - Standard energy weapon, complete with secondary laser targeting to make the bullets home in on an enemy. Candent Rifle - Fires incandescent (heat) bullets. These bullets can inflict the "interference" status (more on that later), and sometimes lodge themselves into a shield layer and continuously attack it for a few seconds. Namek - Rapid fire weapon that has a high spread and does both Solid- and Energy- type damage. You can refill its ammo with either solid or energy rounds. Tesla Mine - Fires a pod that creates a powerful electric field around it for several seconds. Anything caught in the radius is sure to regret it. Grenade Launcher - Fires a powerful explosive grenade. Holding alt fire charges up the speed the grenade will be fired at. Plasma Rifle - Rapid-fire plasma shots that do medium damage. Nice power but expensive ammo. Tesla Coil - Zaps enemies with two bolts of lightning. The bolts do nice damage and you can hit an enemy from medium range. Secondary fire is a rapid lightning attack that twists and curves around (it uses bezier curves. it's choppy and the code is really ugly, but I hope to improve it in the future). Plasma Arc - Fires an electric ball that zaps enemies it passes by. You can't carry much ammo with this weapon, and you usually won't kill any but the weakest enemies with it alone, but it's a very nice way to spam massive damage to lots of enemies before switching to a different gun. Railgun - Power incarnate. Fires a powerful needle-point blast that can go through multiple targets and deal deadly damage to them.
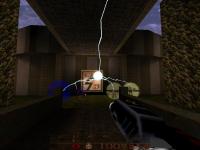
Shields Shielding is one of the most important features. Shields can greatly extend your life, and will define the types of attacks you're more or less vulnerable to. You can equip 3 layers of shielding. When an attack hits the player, the damage must go through the Outer Layer, then the Middle Layer, and then the Inner Layer before finally hurting the player, if there's any damage left. There are 7 different types of shielding. Each has a different cost.
Standard: This shield takes a percentage off damage -- like body armor, but it blocks less damage, heals itself, and lasts much longer. There's Green, Yellow and Red varieties, and each is more expensive but far better. A percentage of the damage that gets blocked will damage the shield, but it heals slowly and can be repaired for cheap at the shop. Standard is equally good against all types of attacks.
G: 15
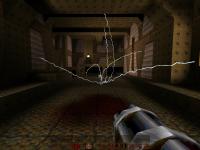
Precision: Takes an exact amount of damage out of an attack. For example, precision +9 armor will take 10 damage out of every attack. Precision shielding will not always reduce damage to 0, but often does if the attack is weaker than the armor. Obviously, this is best used against weak, rapid attacks since it will barely scratch a railgun or other large hit. This shielding takes no damage - it's always there. Impact (not done yet): Takes a percentage out of solid hits. "Solid" hits include nails, explosions, and other impacting attacks. Impact armor has Green, Yellow and Red variety, and it blocks slightly more than Standard armor, but does not take damage - its protection is infinite. The downside is that if you get hit with an energy hit, it actually *amplifies* the damage instead. Tesla (not done yet): Takes a persentage out of energy hits. "Energy" hits include electric, plasma and heat (fire, napalm, etc) attacks. Tesla has the same protection values as Impact, as well as the same numbers for the penalty for getting hit by solid damage. Blink: Blink shielding offers instantaneous protection that's extremely high but short-lived. When damage hits a Green blink shield, for example, the shield flashes on and blocks 100% of the damage. Then the shield goes offline for 4 seconds in what's known as "downtime", leaving you vulnerable for another attack. Yellow blink shielding has no downtime, but it only has a 65% chance of activating, and only blocks 85% of the damage. Red blink shielding is the most unique. When attacked, it turns on for two seconds of 95% protection, and then goes into its 4-second downtime. Blink shielding tends to be more useful against powerful attacks such as a railgun or rocket launcher.
Limit: Limit shielding provides a damage cap, so that only a set amount of damage will get through it; the rest of the attack damages the shield instead. It's the ultimate heavy-weapons buster. There are three types, each with its own limit. Each type also takes a different amount of damage to itself. All 3 layers have 100 health. Resist (not done yet): Resist shielding blocks all status effects, such as poison, being set on fire, interference (shielding flickers on and off, so that a bullet might pass right through without the shield stopping it), slow, etc. One layer of resist shielding provides full protection against all status effects, and will even block out damage such as the heat surrounding a napalm attack, or the electric field around a tesla bomb. The disadvantage is, it takes up a shield slot, which might have been used for shielding to block more damage. (this still may be too powerful, so I may change it later). The type of your shielding is important, as is the order you place them in. Obviously you wouldn't want to use Precision against a railgun, Limit against a machinegun, or Impact against a napalm launcher. However, the order you place the shields in has an important effect - both in protecting the player and other layers, and in making each layer more effective. One example is placing Blink shielding on the outside, Limit in the middle, and Precision on the inside. This way heavy-hitting attacks such as rockets and railguns will be blocked by the Blink armor, protecting the Limit armor and player from unnecessary damage. When the blink shield hits downtime, the Limit armor will reduce heavy attacks significantly before they reach the precision armor. Now that the damage is tiny, the precision armor can go to work, reducing a great deal more than it would if the Limit shielding hadn't been in front of it.
Status Effects There's a good reason to dedicate one whole slot to Resist shielding. There are some nasty status effects in this game. Here are a few examples: Poison - Your health goes down until the poison runs out. Shielding can't lower the damage it does. Poison can't kill the player, but it can reduce his health very low. Burning - You catch fire and burn for a while. Unlike poison, fire is on the outside of the shielding, so it has to go through all three layers before it hurts the player. This can be good or bad, depending on your shields. The player is better protected against the damage, but the shielding is having problems instead. Fire can also kill the player if it lowers his health enough. The fire will go out eventually, or you can put it out immediately by jumping in water, using certain items, or opening the shop menu (if there's a shop nearby). Slow - Your movement and attack speed are lowered. Drain - Your health is being drained to heal the enemy that inflicted it. Drain, like poison, can't kill you directly, but it'll soften you up. Weak - Your attack power is lowered. Interference - Your shields are receiving interference and have begun flickering on and off. This means an attack could pass right through one or more layers of shielding. These statuses can come in several forms: Rider - The status is inflicted when a damaging attack hits the player. Not only does the player get smacked with damage, but he also gets the status. An example of this is burning -- if you get hit by certain monster attacks, you'll be be set on fire and start on fire. Specific - The enemy performs a specific attack that exclusively inflicts a status, but does no damage. For example, the enemy casts a spell to inflict slow on you. Aura - The enemy or attack is generating an aura around itself, and if you get within range of that aura, you'll receive that status. The good news is, once you get outside of the aura, the status should run out fairly quickly, if not instantly. An example of this is interference.
Monsters, New and Old
Some variety will be created in the monsters simply from the shielding they're equipped with. Currently Ogres have good precision shielding, so it's foolish to take them on with a machinegun. Wizards have some limit shield on them, so if you want to kill them quickly without wasting the ammo of an expensive weapon, use a rapid-fire weapon. However, I don't intend to simply slap a few layers of shielding on these classic but over-used demons and call it good.
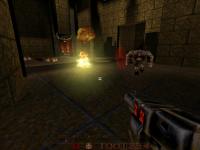
Spitter - Large spider-looking creature, though it's anatomically incorrect for a spider. Its back legs actually hold up the overly-heavy rear segment, which is weighed down by the eggs it holds. When the spider is threatened, it stands up tall, and the rear legs turn the egg-sack around underneath it to point at the threat. Armored - A large empty suit of armor that moves around by an unknown power. It weilds a hefty sword, and it's a very heavy monster, as it clanks noisily with each step. It has a huge precision defense, so use powerful one-hit weapons instead of machineguns. Wraith - A kind of ghost. This spirit's hands are detached and float about freely around the body. Two orbs orbit the monster - one is red, representing Fire, the other is green, representing Poison. When the Wraith points its finger at you, one of the orbs will fly at you and inflict its status (burning or poison) if it hits, and will damage you. The Wraith can also make spikes and fireballs fly at you. This monster also has an aura around it to inflict Slow to anyone who gets too close. Dragon - This dragon cannot fly, but it's enough trouble on the ground. With its Breath attack it can breath flame in a wide sweep, setting anything around it on fire. It also attacks with its claws and teeth. Fire Demon - A fiend that is completely engulfed in flames. The fire creates an aura around it that inflicts damage, and the fiend itself likes to get up-close and personal to attack with its claws. It can also charge forward to ram you, or breath out a fireball for long-distance damage. Luckily, this demon cannot jump at you, but it still quite fast and dangerous.

Raising monsters Occasionally, when you defeat a monster, it will drop an egg. This may be an egg the monster ate or found and decided to carry, or it may be the monster's own egg. Either way, you can sell the egg for a nice price, or take it back to town to identify it and decide whether you want to raise it. Monsters start out at low levels, and you'll have to equip them with shields (and sometimes weapons, in the case of grunts and enforcers) with your own money. However, they become powerful as they level up, and they tend to be tougher than the player once they've gotten a good start. You have several commands you can issue to monsters. Hold down the Command key and you'll see a list of commands such as Stay, Follow Me, Move Here, Attack Freely, and Attack Here.
Story Anyway, those are some of the main features. Here's the story: Conquest takes place 10 years After Quake (AQ). Shubby was defeated, and people weren't expecting another demon invasion anytime soon. So, you can imagine the surprised looks on their faces when the demons came back and began slaughtering them all. After a few years, the multiple requests for military protection from the demon raids began to make their way through the bureaucratic chain of command. Outraged at the massive loss of life, LT. Commander James Blue Gonner immediately filled out a request for the form he needed to fill out to request a senate hearing. Within 6 months - a monumentous record at the time and a testament to the urgency of the matter - he appeared before the council and managed to convince them to allocate five thousand dollars and even a couple soldiers to deal with the situation, effective in 12 months, authorization pending. Later the project was scrapped to free up funding for a neighborhood improvement bill. The senators then voted to give themselves a raise. Tired of waiting for the bureaucratic buffoons to act, Gonner decided to handle things himself. He filled out a Notice of Away Without Leave (NOAWOL Form 11-13) and a Request to Go Nuts and Blast The Hell out of Some Frigg'n Demons (MIL Form 88-11.32 RTGNABTHOOSFD), but they were both denied by his superior officer, who didn't like him. In the mean time, you, a lowly peasant computer programmer who is out of work, have wandered into a small town on the fringe of demon territory, trusty shotgun in hand...
I like feedback, so feel free to send me any comments or complaints by e-mail.
|
|

|
||